Showing posts with label Unit 6 - Practical Skills. Show all posts

Friday, 14 June 2019

Evaluation upon Practical Skills.

The practical skills I have managed to develop throughout the year I believe allows a professional insight into the production industry and how to create a successful production with thorough planning - allowing consideration for any factors that can affect any of the process such as filming and editing. This was thoroughly used with all of the productions that I partaked in, from the 4 Hour Film Challenges made at the beginning of the year to the final productions I have produced - using contingencies as a way to consider undesirable factors, such as bad weather on a shoot that was supposed to be forecast sunny etc. Combining all factors in my contingency has allowed me to produce content, without the need to compromise dramatically and overall, disturbing the workflow.

Example of Unit 36 Music Video Gannt Chart
Along the lines of planning, my process has changed practically throughout the course length, within the beginning of the year I would plan my projects within the one filming date, not taking consideration of the length of time the process of work that needed to be uploaded to the blog in the time constraint - this ultimately led me to be stressed with filming as I knew I had incomplete blog posts that needed to be completed and posted in time; causing my evaluations to be rushed. I did change my approach towards complete work within a time period by introduce the system of Gannt Charts, which were constantly open on my computer screen throughout the duration of a particular unit. The Gannt chart included the number of weeks from the day the unit started to the deadline, alongside a list of tasks that needed to be completed in an x and y format. I also started the gannt chart by colour coding the tasks I wanted to get done each week, allowing a sense of structure and stability to work comfortably before the deadline. I found this system work successfully - despite the odd blips here and there, where I took a break from doing work for personal reasons. To expand further, the gannt chart allowed me to keep track of all the work that needed to be completed, therefore I found myself not forgetting anything on the list - allowing me to achieve higher marks towards the end of the course.

The inclusion of equipment and health and safety was vital to my productions, as otherwise would have not been a professional and thought out plan. Within every production, I have created a blog post to explore the Equipment I will need for each shoot, alongside a contingency plan incase something out of the ordinary occurs - this will include: spare batteries if a camera dies, a back up tripod incase the one I have is faulty, or even a second shoot date in mind - to allow myself to finish anything that is incomplete. Within the Health and Safety requirements, I have developed my understanding by doing a location recce before shooting to consider all of the factors that could affect the health and safety of myself and anyone else that I am working with - this included factors of the weather and cables from electrical equipment such as lights etc. All this is included in the blog posts 'Planning' or 'Equipment List' so it combines with the recee/ anything that has to with H+S.

The research within coming up with ideas, played a role for each unit I completed. This variated within each blog post through the use of examples or stimuli to base my research - an example of this would be when I looked at music video theories alongside producing detailed examples of the theories being applied. Furthermore, I will expand upon my research by allowing qualitative and quantative results through the structure of a questionnaire or survey - this allows me to further expand upon ideas and evidence towards a final production. I have found doing this work successful for myself as it backs up my ideas sufficiently - however, I will admit, I do still struggle with constructing an accurate questionnaire without questions being too broad. 

Allowing consideration to combine camera and lighting techniques with other elements such as the exposure triangle has proven successful, I have managed to expand upon my knowledge from A-Level Photography to use the exposure triangle successfully but also developing this to use in the video format, I always ensure that the shutter speed is at least double the frame rate of the video to allow a smoother looking footage unlike a choppier looking one that would be achieved by not caring about such things. Aperture and ISO is considered in order to balance the light allowed in the lens, without the ISO being too bright - causing grain on the footage, whilst Aperture is only used when I want something to have a shallow focus, otherwise i'm not too bothered with results. The experimentation of other lenses in film has allowed me to achieve desirable results when focusing upon aperture, for example, I used the 50mil lens in my Promotional video to shoot a clip of the pool balls being broken out of formation - this turned out successful when using a low aperture and lower ISO (due to the vast increase of light due to the wider lens opening).

Overall I believe this year in regards to practical skills has been more than successful, due to my professional outlook upon the planning and development of productions throughout this year, if i were to change anything, I would most likely wish that I could have used gannt charts in my earlier productions, however it is all about the development and it clearly shows throughout the year of my work.

Thursday, 13 June 2019

BINS & LABELS USED FOR ORGANISATION - PROMOTIONAL


1.


                                                                           2.


3.    4.


The labels on each of the clips are colour coded.

KEY:
      - Clips that need stabilising/MAYBE will make it into final production
   
      - Clips that will make it into the final production

Saturday, 1 June 2019

EVALUATION + FINAL GANNT CHART OF SCHEDULE (Promotional)

The bar when filming on second day, closed off
with no key accessible.
After completing production on my promotional video, I finished off the editing by adding a royalty-free soundtrack, to avoid any copyright strikes or lawsuits that the company could go under, as a business would not have permission to use this. I then lined up and followed the editing tutorial(linked to my blog); matching the transitions with the beat of the song. I chose an upbeat song for the promotional video as Mr Barlow discussed in our initial meeting how he wanted to appeal to a younger audience at the club, as the demographic currently withheld is 40 years+. I believe the editing process worked out successfully, as my time management was consistent - as shown by my gannt chart, leaving me less stressed and allowing me to make mock-ups of what i want the final production to look like. I also found the custom transitions a vital part of the video as it portrays a more professional & modern feel towards the audience, it also approaches the product launch sub-genre that I planned to conform too.

Within Editing, I also had to consider such things, like typography and legality information + any requirements/information that needed to be added. My client did not have any specifics when it came to such things, besides asking, all that was required was the highlight the new pool room and preview the new diner complex which is still under construction. I chose the typography that consists within the majority of the final product to have a Bold font; named: 'The Bold Font', which was 100% Free, meaning that I could use this commercially, without any legal issues. This font was coloured white with a black outline, alongside a gold outer glow - as this allowed the font to stand out without contrasting with any main colours displayed in the footage, such as green from the pool tables. I took the opportunity to also include a chalk board like font, to coincide with the chalkboard footage I shot whilst I was at the Sports and Social Club, this was to promote any offers - and to also enforce a visual aesthetic to the audience, allowing them to feel intrigued and relaxed when watching. Within legalities, I knew from previous projects that I would have to include the 'drinkaware' logo for responsible drinking as I was advertising for a business which sells alcohol. Furthermore, this will also reinforce the place/product that I am advertising for the consumer.

Shooting itself, was okay, I managed to organise the filming of each clips by doing focusing on different angles of an area in each time slot. I did also film quickly the rest of the club quickly per shoot, so I had a back up if anything did go wrong. I would, however, change some of the footage, as I found some of the preparation from the club itself unsatisfactory. I am thankful I had two days as my contingency to film, however, I found certain facilities that I wanted to re-film(i.e: the bar) not available, and not being able to film - such as the Bar area, as the shutters were down and the person running the club for me to film during did not have the keys. It made things difficult, but to get over this I should have spent more timing on this during the previous session.

In conclusion. i’m very happy with my final outcome, I believe that I have conformed to the Product Launch sub-genre successfully, allowing successful promotion towards the newly refurbished Pool Room and new launch of the pool room, with the facilities and accessibility I had when filming. I would definitely refilm for a third day if I were to improve this process in the future, shooting in specific areas to allow a wider range of film. I would also improve my time management also to be consistent as I found during the middle of the timeline, I was lacking in productivity, this is a personal issue that I will work on in preparation for future clients, to prove my reliability.

Tuesday, 21 May 2019

CLIENTAL FEEDBACK


FINAL PROMOTIONAL VIDEO - BENTLEY ROAD SPORTS AND SOCIAL CLUB

Editing Tutorial - Custom Transitions for my Promotional Video

After successfully planning and completing new shoots, I knew that as part of my project, I wanted to experiment with different types of custom transitions due to the club wanting to appeal to a younger audience; but also to defer away from the stock transitions on Premiere Pro, as this could make the final production look amateur (unprofessional). Therefore, I decided to look at a Youtube Tutorial to guide me into a new practical skill, that allows me further experience in editing.

The tutorial I looked at is linked below:

The video contains a step by step instructional tool in order to achieve a custom transition pack, I will list these steps below.

1. Download the link full of presets in the description box.
2. Install Presets into Premiere by clicking on the Presets box then right clicking and clicking the 'Import Presets...' option.
3. Click between the clips u want to use for your transition. Use the arrow key on your keyboard and go back the amount of frames the transition requires on the first clip (in the name) and use the razor blade tool to cut that point - do the same for the second clip
4. Create an adjustment layer and drag this onto your timeline, and cut down/stretch to the size of both of the newly cut clips.
5. Add the '0. Base Preset' to both of the newly cut clips.
6. Then add the transition you chose to the adjustment layer.

After practicing this in post production, I found little to no issues in using this for my production, this has allowed my video to look more professional and overall my video editing looks sophisticated.

Wednesday, 8 May 2019

GANNT CHART AS OF THURSDAY 9TH MAY 2019 + COMMUNICATION WITH CLIENT

This week, I have managed to start planning my production, including my contingency plans (on my blog under the label 'promotional video'). I believe I have successfully made it back on track to completing my deadline on time. There isn't much to update on the communication side of things, other than I have been in touch with my client to see if I was still okay to shoot at the arranged time set in the meeting.

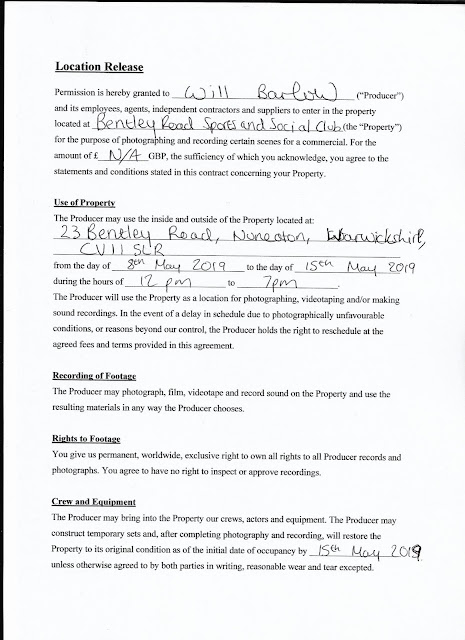
Location Release Forms - Permission to produce a promotional film at Bentley Road Sports & Social Club


Tuesday, 7 May 2019

STORYBOARD W CONTINGENCY CONSIDERED

This storyboard is accountable for both a contingency planning in regards to the newly refurbished diner area, as in the meeting, it was discussed that the Diner area wouldn't be functional until mid-end of may, I had to make some compromises, therefore in my planning I have made the decision to introduce the new diner area in a short but straight to the point 'Coming Soon' approach, as this will build up further anticipation for the clubs business. The overall advertisement will be approx 1 minute long, this is due to advertisements used in television/social media platforms being within that format - Especially comparable to sites such as Alton Towers, where they advertise for approx 45 secs. 

My first shoot will be on Wednesday 8th May 2019, therefore I will be ensuring that all legalities of this shoot are accountable for, due to me shooting at a period of time where the club is closed, I will not have to worry about Release Forms, however I will still need to gain a Location Release form from the client in order to allow myself permission to shoot there over the next two weeks.


Tuesday, 30 April 2019

MEETING WITH CLIENT, OUTCOMES, LOCATION RECEE AND H+S INSPECTION

QUESTIONS AND NOTES FROM MEETING:


After the meeting, Melvin Barlow showed me around the club, alongside introducing me to the new Diner area, which he believes will be ready to be filmed in Mid May, I have stated to him that although It is possible to get this done by the time of the deadline of my production, I may have to resolve into not filming the diner area, as this could interfere with the feedback part of my grade/editing process, leaving me with little time to make any amendments they want me to make.

However, below is the photos of the diner (As of 10th April 2019):


In regards to filming, I would most likely feature a pan shot of the fully completed diner, to convey the high cleanliness, with the odd shot of food being cooked/presented in a takeaway tray/plate, I will make a penultimate decision on whether we use this room to film, due to the fact it is incomplete as of today - when I go to shoot, if not, I will incorporate the promotion towards the end of the video with a 'sneak preview' - fitting in with the Product Launch genre of Promotional videos. I will create a storyboard to reflect this idea.

I will have to be careful in this room when filming as tools and other equipment are laying around. To prevent this, I will ensure and ask the client to not leave any cables lying around, plug switches turned off and any tools to be put elsewhere than the floor, leaving no obstacles for myself and others to potential trip over from.

The pool room:


The pool room features 6 pool tables, each with standalone light fixtures, this is the main attraction to the club with the facility to hire a pool table for £5 for an hour - alongside public matches through the Bentley Road club pool team. I will ensure to make this the main 'feature' of the final production, through different creative shot types, although the pool tables have been available to public use for over a year now - I will be portraying this as a product launch; I asked Mr Barlow in the meeting if he was okay with this and he said he was, as notably regular customers are only aware of the change - therefore he would like to highlight this to increase footfall for the business.

In regards to Health and Safety, there is minimal worry in this room as it is a big open space, however, in regards to lighting and equipment, I have asked the client to go all normal duties and clean the space before I arrive, so I don't knock over half empty cans from the previous night at the club, as this could land on an electrical appliance or the little bit of concreted floor, which could cause a slipping hazard.

The Bar Lounge/Main Room:

The bar lounge is present as soon you walk into the clubs main entrance, The spacious room features two sitting areas that can accommodate approximately 100 people in total. There is also a singular pool table in this room, which was present before the pool room refurb. Alongside this there is a television and a music system, allowing customers to play their favourite songs whilst enjoying a drink. I will be promoting the family friendly aspect of this room as families can enjoy this space as there is plenty to do to accommodate all. The Bar itself offers various types of alcoholic and soft beverages, alongside snacks such as Pork Scratchings, Crisps and chocolate bars. There is also wifi on the premises, but you will have to ask bar staff for the password - I will be highlighting this in the production but I won't be mentioning that it is 'Free' in case business propositions change in the future.

Health and Safety is a similar case from the bar lounge to the pool room, I have asked the client to go all normal duties and clean the space before I arrive, so I don't knock over half empty cans/glasses from the previous night at the club, as this could land on an electrical appliance or the concreted floor, which could cause a slipping hazard.

To conclude, I believe my meeting with Bentley Road Sports and Social Club looks promising for myself, I have made them aware that although I am producing this for them, I will have to follow guidelines for my own personal grade for HNC - whilst maintaining professionalism and following all aspects of the production seriously, with legalities and accurate information. I have sent the client a following email to ensure we are still okay for the first shoot which is Wednesday 8th May at 2PM, alongside any additional information which could guide me with my post production/editing.

Wednesday, 27 February 2019

TESTING 'COLOR KEY' PRESET ON PREMIERE PRO - IMITATION OF GREEN SCREEN


IMITATION OF GREEN SCREEN: PLANNING

Practicality is definitely a huge part I need to consider before producing my music video. Therefore in advance I decided to test out and think of ways I can use particular techniques without certain equipment. Therefore, I decided to test out the 'Color Key' tool that is available on Premiere, but instead of a Green Screen (which I do not have access to/the facility to use), I used the white backdrop in the Photography Studio. 

When setting up, I knew I had to be aware of the lighting situation as "It is really difficult to shoot green screen video. The goal is to have a flat background with no shadows"(Phil, 2019). I knew I had to be as accurate as possible when it came to lighting techniques, therefore, i used the three point setup, in order to avoid any additional shadows, where possible. When filming, I got a friend to be my subject, asked her to move around to see how well the effect will work in post production.

When editing, I followed a few steps.
The settings I used for the clip embedded above

Step 1. Import and select the chosen clip from the library onto the timeline (Video 2).
Step 2. Go into the Effects tab>Video Effects>Keying>Color Key, drag this onto the clip in the timeline.
Step 3. In Effect Controls, use the filter tool to select the background.
Step 4. Increase the capacity of each three sub-categories in the Effect Controls tab.
Step 5. Drag your chosen background clip/image and place this in Video 1 of the timeline.


Overall, I found that when shooting a close up, this will work perfectly fine, as long as there is minimal white within the scene. However, when shooting a mid-long shot, the effect can reveal more of the background - this can be an advantage and a disadvantage, allowing a more post-modern, purposeful approach, but also allowing the video quality to look poorer. I have to consider in preparation to filming that my subject is wearing nothing similar to the background colour. I am happy to continue using this, if a green screen isn't available when filming.


Bibliography:
Phil, Accessed 27th February 2019, [online] Video School Online - Green Screen: How to chroma key in Adobe Premiere Pro https://www.videoschoolonline.com/green-screen-how-to-chroma-key-in-adobe-premiere-pro/

Wednesday, 23 January 2019

EVALUATION OF FINAL PRODUCTION (mind.)

I am more than happy with the final production I have been able to create. I believe I have been able to represent and apply depression in conjunction to Lacan's 'Mirror Stage' theory effectively. I split filming into three separate days in order to allow myself a variety of shots within each told narrative.

The first shoot was the vintage videos I shot, which are found in the beginning of the narrative. I used an app called VHS Cam on my phone (Samsung Galaxy Note 9) in order to produce old style, VHS Camera footage. The reason why I chose to do this for my project is that it is common in most families to have "your most cherished family memories are stored away on old VHS tapes" (Komando, 2016), and I wanted to give a meaningful back story to the subject in the film. Furthermore, I really wanted to emphasise the good things in the subjects life, in order to gage background on the idea of the depression and to allow the viewer to percieve the Lack of happiness that the subject is witnessing, due to the soul draining mental disorder. I did have to adjust the dates in the app settings screen to give background upon what is being shot - this was no issue but it allowed viewers to encode information, without being an active viewer. I found the clips easy to film, I shot at my sisters house (as shes just had a baby), at a fast food restaurant, a friends house, a coffee shop, and college - I wanted to ensure that I had enough 'memories' to enforce a detailed vision into my subjects mind. Within editing, these shots were montaged together in the beginning of the sequence. I believe that these worked effectively in conjunction to the voiceover and the backing track.

The second shoot was done in my own home, using my Canon 200D DSLR, two led lights, and most props on the list, such as: medication, cigarettes. The first thing I ensured in this shoot is that health and safety was explained to the person assisting me in filming, I made aware any tripping hazards and explained safety when using the lighter, making sure that the equipment/household items weren't subject to catch fire, or that myself wasn't burned when using it for the shot. I wanted to recreate the cinematic shot first that I analysed in my planning. For this I adjusted my camera frame rate to 50fps as I wanted to capture an increase amount of motion, for if i wanted to use the clip in slow motion. After setting my lights up in the places they were previous (one facing myself, the other facing the other subject who enters the scene later), I then altered the camera settings to film. I kept the shutter speed as low as I could get due to the slow shutter speed used in that previous image, however, part of me believes this was a mistake as of the 'double shutter speed of frame rate' guide, I found no problems in post production with this clip. The aperture was kept as wide as possible (f1.4, 2.8) to allow more light into my shot, without getting as much grain impact from the ISO, which was set to 6400. All shots in the bedroom maintained the same settings. Within lighting, one light was adjusted in certain scenes to flash like a strobe, I wanted to portray the feeling of anxiety - a common side effect/disorder felt with depression. The shots following this were shot on the stairwell in the mirror, to furthermore reinforce the idea of Lacan's mirror stage, bringing in an actual mirror. I wanted to show what the subject saw themselves, allowing the viewer to engage into his personal life. Shots I used to emphasise the personal life in this shoot included, over the shoulder, close up, long shot (still). I did also experiment with edge lighting in one shot, to connote the contrast between the good and the bad parts of the characters life.

The third shoot was in the studio, shooting footage on a black background for the paragraph where i discuss existential thoughts. I refreshed upon my knowledge on health and safety and made sure i referred to my blog post before entering, to remind myself of the rules. In terms of the camera settings, I ensured the exposure triangle followed the studio settings of 1/125, F8, ISO 100. The (singular) studio light was pushed to the back of the room so it couldn't light the marks upon the black wall, but still allowed for the subject to be lit.

Editing was pretty simple, I used Premiere Pro on my iMac to edit. It all ran smoothly apart from one particular shot, which was the three clips overlayed of the subject in bed - this caused my mac to freeze in playback, allowing extreme difficulty to edit. I am unsure why this is as my Mac is a newish mac with 16GB of ram, using an SSD to read and write data, I believe this was a software bug. Other than that, transitions such as crossfading were simple. I used a constant power transition and the razor tool upon my soundtrack in order to lower the volume seamlessly when the monologue/voice over is added in. I recorded my monologue using a Blue Yeti Snowball Mic and encountered no issues importing into my project.

I chose the soundtrack M83 - Wait, due to the minor chord progression and its previous use in the film 'The Fault in Our Stars', which was used in the same technique, a voiceover featuring montage of clips, with parallel editing of the 'then' and now. The one issue I did have was with trying to find an instrumental of the song, I looked on various services including YouTube, iTunes Store and Spotify and couldn't find one. I, therefore concluded to just using the original song, and lowered the volume as said when necessary.

I believe that overall, this project was successful, despite issues I encountered along the way. I ultimately have nothing I wish to change about this project in terms of filming, other than editing - which would to be - be more precise in transition timing, but that is all.  I can say I focused upon the Lack (Lacan's theory) in my characters life, whilst also displaying the positives, offering an awareness/insight to people who live with depression.

Monday, 7 January 2019

EQUIPMENT LIST: UNIT 11 - FILM STUDIES PRODUCTION

The list below has been categorised, regarding what equipment I will need, whether behind the camera, or props for the mise-en scene:

CAMERA EQUIPMENT:
- Canon 200D DSLR - MAIN CAMERA
- Samsung Galaxy Note 9 - SECONDARY CAMERA
- iPhone X - SECONDARY CAMERA
- Tripod for DSLR
- 64GB Ultra Fast SanDisk SD Card.
- 50mil lens - FOR EXTREME CLOSE UP SHOTS (to add variety and add to cinematic conventions)
- Standard 18-55mm lens - FOR MAJORITY OF SHOTS DUE TO VERSITILITY

LIGHTING EQUIPMENT:
- Lamp - Mise-en Scene
- LED Light's - Approx 2 for Production
- Studio Lights - For any shots that are shot in the studio upon a black background.

MISE EN SCENE PROPS:
- Pack of Cigarettes & Cigarette Buds
- Ash Tray
- Bed (not made)
- Clutter (essential mess)
- Empty cans of drinks
- Empty medication packets.
- Lighter

EDITING EQUIPMENT:
- iMac/MacBook Pro with Adobe Premiere Pro
- Blue Snowball Microphone - TO RECORD VOICEOVER MONOLOGUE
- VHS CAM APP ON SAMSUNG NOTE 9 (£2.99 APP COST) - TO GATHER OLD STYLE VIDEO FOOTAGE

All of the equipment and props above will help construct the scenes I plan to shoot - overall achieving a successful cinematic production.

In terms of filming with my DSLR,  I believe that I will be using my Bedroom primarily with the studio being used in any other circumstance.

In terms of Health and Safety, and also precautions, I will need to make sure that:
- Wires for any equipment, such as Camera Battery, External lights, are tucked away, but are made aware of for anyone helping film.
- Food and drinks will not be taken into the studio in order to prevent spillages from occuring, this could result as a hazard for any electrical items.
- Any equipment will be fully tested/charged before use to avoid any issues when filming.
- Any props will be carefully placed and used in the correct manner.
- The lighter used will be used in the appropriate manner, avoiding any hazard that can be caused, such as fires etc.

BRIEF & PLAN FOR PRODUCTION - FILM STUDIES (UNIT 11)

REVIEWING THE BRIEF & PLAN

When reviewing the Assessment for Film Studies, I decided to opt for the option of creating a short film, applying one of the theories we have studied for the unit. I decided to focus upon Lacan's mirror stage theory, as I feel it will be easier to articulate into film with the resources I currently possess.  I feel that I have a clear understanding of knowledge upon the Mirror Stage theory, and therefore I feel that it would be easier to articulate through cinema, especially if I relate a storyline to personal experiences.

I've decided after a stimuli (which will be discussed below) that i would like to focus upon the idea of mental illness', specifically depression and other emotionally distraught diagnosis'. I feel this would articulate the mirror stage particularly well, due to the way depression can make someone feel; "experience depressed mood, loss of interest or pleasure, feelings of guilt or low self-worth, disturbed sleep or appetite, low energy, and poor concentration." (Mental Health Foundation, 2019). As someone who has dealt with Depression and other mental illness', I believe I can articulate this into cinema with the sense of realism. 

@will.barlowmediaproduction (2018), "The Aftermath" INSTAGRAM
Stimuli came to me from revisiting my A-level Photography project, in which I focused upon my own experiences with Post Traumatic Stress Disorder. I knew initially, that I didn't want to recreate this as it would lack creativity, and wouldn't relate to the brief. However, I found some photographs that would incorporate into this production, that I would like to recreate. An example of this is this image to the left. I constructed this image using two battery powered LED lights, a DSLR camera set in Manual with the Shutter Speed set extremely slow (about 5 seconds). I constructed this image in my bedroom at night to reinforce the preferred reading. I wanted viewers to see that the person lying in their bed was stuck in a state of shock/depression, where they couldn't leave their bedroom due to their mental illness preventing them, they felt safe in only that confined space. The woman in the image is representative of hope, a mother figure if you will; guiding support - offering warmth and safety (also reinforced in the mise-en scene as the lamp next to her is in the shape of a home, with tungsten warm light out). The subject in the bed has his back turned as he doesn't know what to trust, and is stuck in isolation, visually depictable by the cool toned lighting hitting his face (from the LED's).

Incorporating this into video will be difficult, due to the shutter speed issue and different techniques I will have to experiment with, however, if I keep the lighting the same, and experiment with either slow motion or the 'smudge-motion' technique, it may be proven successful. I can apply the image above as a base stimuli due to the similarities it withholds with the symptoms of depression.

In separate posts, I will write up a script using the appropriate cinema format, location research and an equipment list.

Bibliography:

Mental Health Foundation, Accessed 5th January 2019, [online] "Depression | Mental Health Foundation" https://www.mentalhealth.org.uk/a-to-z/d/depression

Will Barlow, 25th April 2018, [online], "The Aftermath: Part 2" - https://www.instagram.com/p/BiAfs4thXF6/

Wednesday, 14 November 2018

Evaluation on HK New Wave Video Essay.

After gathering all my research together, I decided to create a video essay upon how Wong Kar Wai influenced the second Hong Kong New Wave. I focused upon three of his films to do this, Chungking Express, Fallen Angels and In The Mood For Love. I also benefitted from contextual research of Hong Kong in that period, using video interviews of Wong and videos of the official handover from Britain to China in 1997.

Initially, my aim was to discuss how Wong incorporates cinematic techniques in order to portray the social context of the period of time. This was fully supported throughout my script - with quotes from various sources outlining the context of HK at that time - this including books, websites and video interviews. I tried to captivate and emphasise a numeral amount of times how Wong does this each film, and I believe I have done this successfully.

When recording my voice over, I did end up stuttering quite a bit and having to re-record many times. In terms of equipment I used a Blue Snowball microphone in order for the audio of my voice to be clear and concise, rather than muffled. I recorded in Logic Pro X and then exported to audio as an AIF file to be added into my Premier Pro project.

The soundtrack was something I talked about in my essay, so I thought it was suitable that I incorporate each movies soundtrack to each subject. It turned out successful, however, audio levels at times became overpowering within the soundtrack, therefore being unable to hear the voiceover. To rectify this, I adjusted the audio levels of the soundtracks to -4db, whilst increasing my voiceover to +2db.

I feel that the structure in which the essay goes is fluid. I think that there is no confusion in following points due to the reinforcement of the visuals that are alongside it. One particular part i'm fond of is the transition from Chungking Express to In The Mood For Love. I felt that the audio and visuals transitioned perfectly without it seeming too abrupt, allowing a seamless transition for another point to be raised.

In terms of improvement, I believe that I could have found some more quotes/references in order to support the movies themselves, my contextual research was strong but that was my main priority, In terms of future projects, I will need to balance out the quotes I am looking for and make sure they are consistent across the Video Essay.

Sunday, 11 November 2018

Health and Safety - Using the Studio & Filming Outdoors

Studio:
When working in the photography studio, it is a requirement that everyone is aware of the responsibilities upon using the equipment and the surroundings that they are in. It is vital that you  and other members in the room take care of all equipment provided with caution, in order to help prevent any accidents or hazards from occurring. Also make sure that the FIRE/EMERGENCY EXITS are established when entering, so you can leave the room safely if a fire or hazard occurs.

There are initial circumstances to look out for in the studio in order enable a safe experience:
- Make sure there are no cables or objects on the floor which could able a tripping hazard.
- The bulbs in the studio lights are using a high voltage, therefore they could over-heat. If smoke or any abnormal behaviour occurs in terms of the lights, inform the studio technician immediately.
- Due to the confined space, only people who are required in the studio are allowed, any guests in the studio must follow and be aware of the health and safety guidelines.

Outside:
Weather - It is essential that all crew members are dressed appropriately for the day of a shoot, so be aware of the weather a day in advance to avoid any issues in terms of clothing. It is also vital that when shooting, especially in rain/extremely hot weather, you are cautious of the equipment you are using. Failing to do this will cause in the equipment becoming water damaged or over-heating.

Release Forms - When shooting outdoors, you may find yourself in a situation where a young person is in your shot. As required by law, you must ask for permission in order to use a young member of the public into your footage.

Food & Drink - When working on a project, it is vital that all members of the group have drank plenty of water and have eaten to some degree, especially in hot weather, it would be advisable that the group you're working with go out and eat before a shoot and carry a bottle of water in order to stay hydrated.


Friday, 19 October 2018

Behind The Door - V2 (Four Hour Film Challenge - Horror)


Four Hour Film Challenge: Horror Genre.

BRIEF & PLAN:
BRIEF MESSAGE
For this weeks film challenge, we were given the horror genre - which our group are familiar with. To save time during planning, we decided it would be better to show improvement than to do a new idea which would take away valuable time which could be spent on working on other units. For improvement, we looked at everything that was pointed out in the critique that could be worked on. This included:
- Conforming to the 180 degree rule, so the viewer can follow the storyline
- Scarier reactions, to convey tensions and an enforcement of the narrative.
- Closer editing between shots.
- A real 'horror' jump scare.
We thought it would be a better idea to explore the location prior to filming so we could find any narrative devices that could benefit a better and thought out project. To our surprise, we found the word 'HELP' carved inside a cupboard, in a room we filmed in previously - filming in this room was an improvement we needed to fix anyhow, as we broke the 180 degree rule and there was not much significance held. We also thought about using an LED light, however, after trialling this, it was proven to be too bright - causing a lack of conformation to the horror genre. We decided to stick and alternate the positions of our phone lights. As advised by Billy Moss, we watched 'Lights Out', the conventions of this film used shot/reverse shots and match on action editing. There is also evident use of non-diegetic eerie sounds that help build up tension in conjunction to setups in lighting which variates between low-key (mostly used) and soft light setups (Example: the lamp being the only light source in the scene). Taking inspiration from this, we decided to variate between a silhouette as the 'ghost' / 'dark figure' that haunts the location to the character searching the location; creating a parallel storyline (put together later in parallel editing).

FILMING & EDITING:
It was important when filming in lowkey lighting, that we were considerate of the exposure triangle. We shot with the aperture at the lowest f/stop - which i believe was f3.5. The reason behind this is to allow as much light into the lens as possible; the shutter speed remained at 1/50 and the ISO was bumped to ISO 3200 - although there was visible grain in the shot, there was only so much we could do with the light sources we used. Filming overall was okay, we ended up filming multiple takes of the reaction shot as we wanted to improve and make the reaction as 'real' as possible, offering verisimilitude and reality within the audience response. We also practiced using some of my own personal photography knowledge, using rule of thirds and pull focus - from the character to the cupboard door.The editing was a simple process also, we took our existing Premiere Pro CC file and took away half of the footage, until the main character reached the first door (after the mirror dutch angle scene). I stabilised the handheld footage which created a distorted effect on certain clips -similar to the turbulent displace tool; although it was a mistake in the editing process, we decided to stick with this as it offered a disoriented perspective that the audience could follow and not be confused by. I used the razor tool to chop up the silhouette clip and the 'HELP' clip. We then structured this with flashes of each clip, offering parallel editing into the mix. Within audio, we used the Adobe Premiere Pro (Horror) Sound Pack for the 'help me' whisper you hear and the scream at the end. The non-diegetic eerie soundtrack was the same from before. We added audio effects to the scream sound effect - we used the 'reverb' to allow an echo (creating a sense of isolation and abandonment of the location) and also changed the pitch, to a more realistic woman scream.

CRITIQUE:
Within the critique, the feedback was much more positive than before, people preferred this version and some said that they "were actually scared". If we were to improve on anything, it was storytelling and also make sure the mise-en scene (the characters outfit) is all the same. Just to allow background to what was going on in the scene, but overall it comes with practice. I am very pleased with how this project went, If I were to change anything myself, it would to simply add a letter box frame, to create a more cinematic look.